Advanced PFT Lab Software Functionality
EasyOne Connect offers full PFT software functionality, including pediatric incentives, QC grading and result interpretation, XML export, custom provocation protocols, and advanced commenter functionality.Proven Bi-directional Integration with Top EMR/EHR Systems
Improve your workflow with easy transmission of patient information and return results automatically into your EMR.Superior Cybersecurity
Protect your patient information. Patient data is protected at rest and in transit.Centralized PFT Review
EasyOne Connect software can be installed on multiple PCs and patient data can be accessed and reviewed centrally.


Why our customers love us
- Our academic activities related to trainings and continuous learning for the specialists that take care of the respiratory health in our region, are supported by new technologies. Our experience with ndd devices has been very positive because they adapt to our necessities, they are always updated regarding new standardization and technological advances.


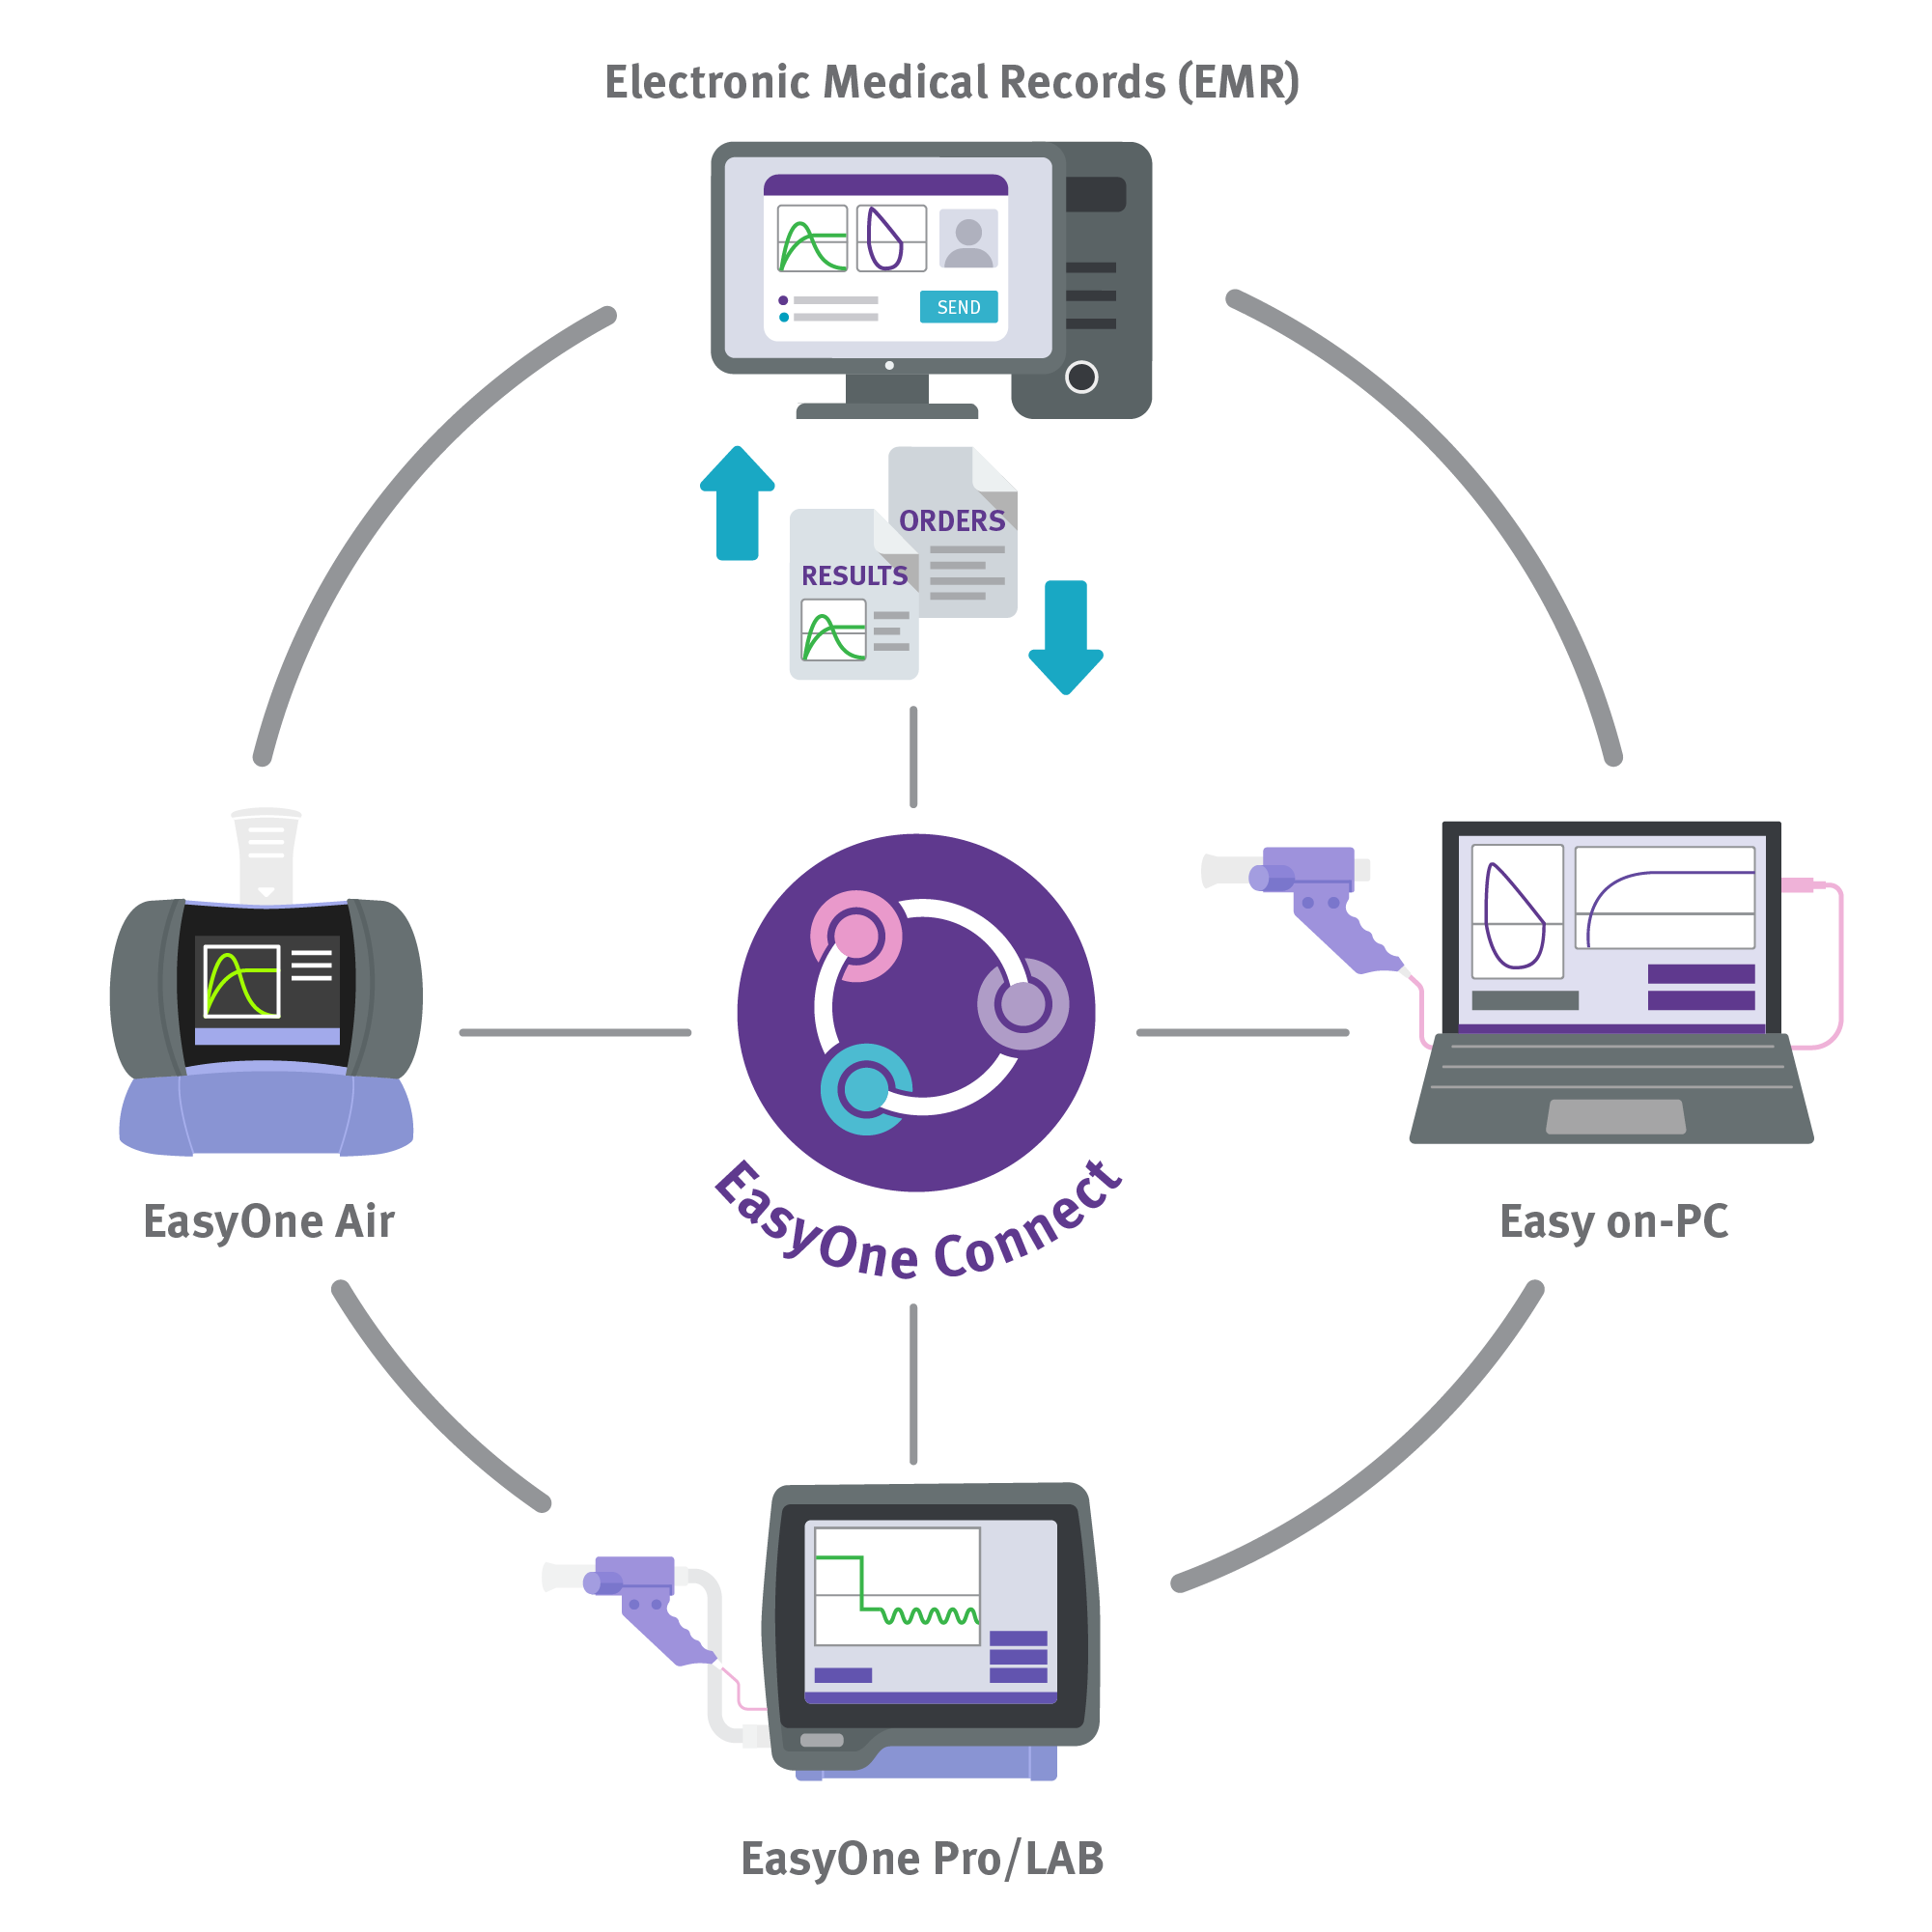
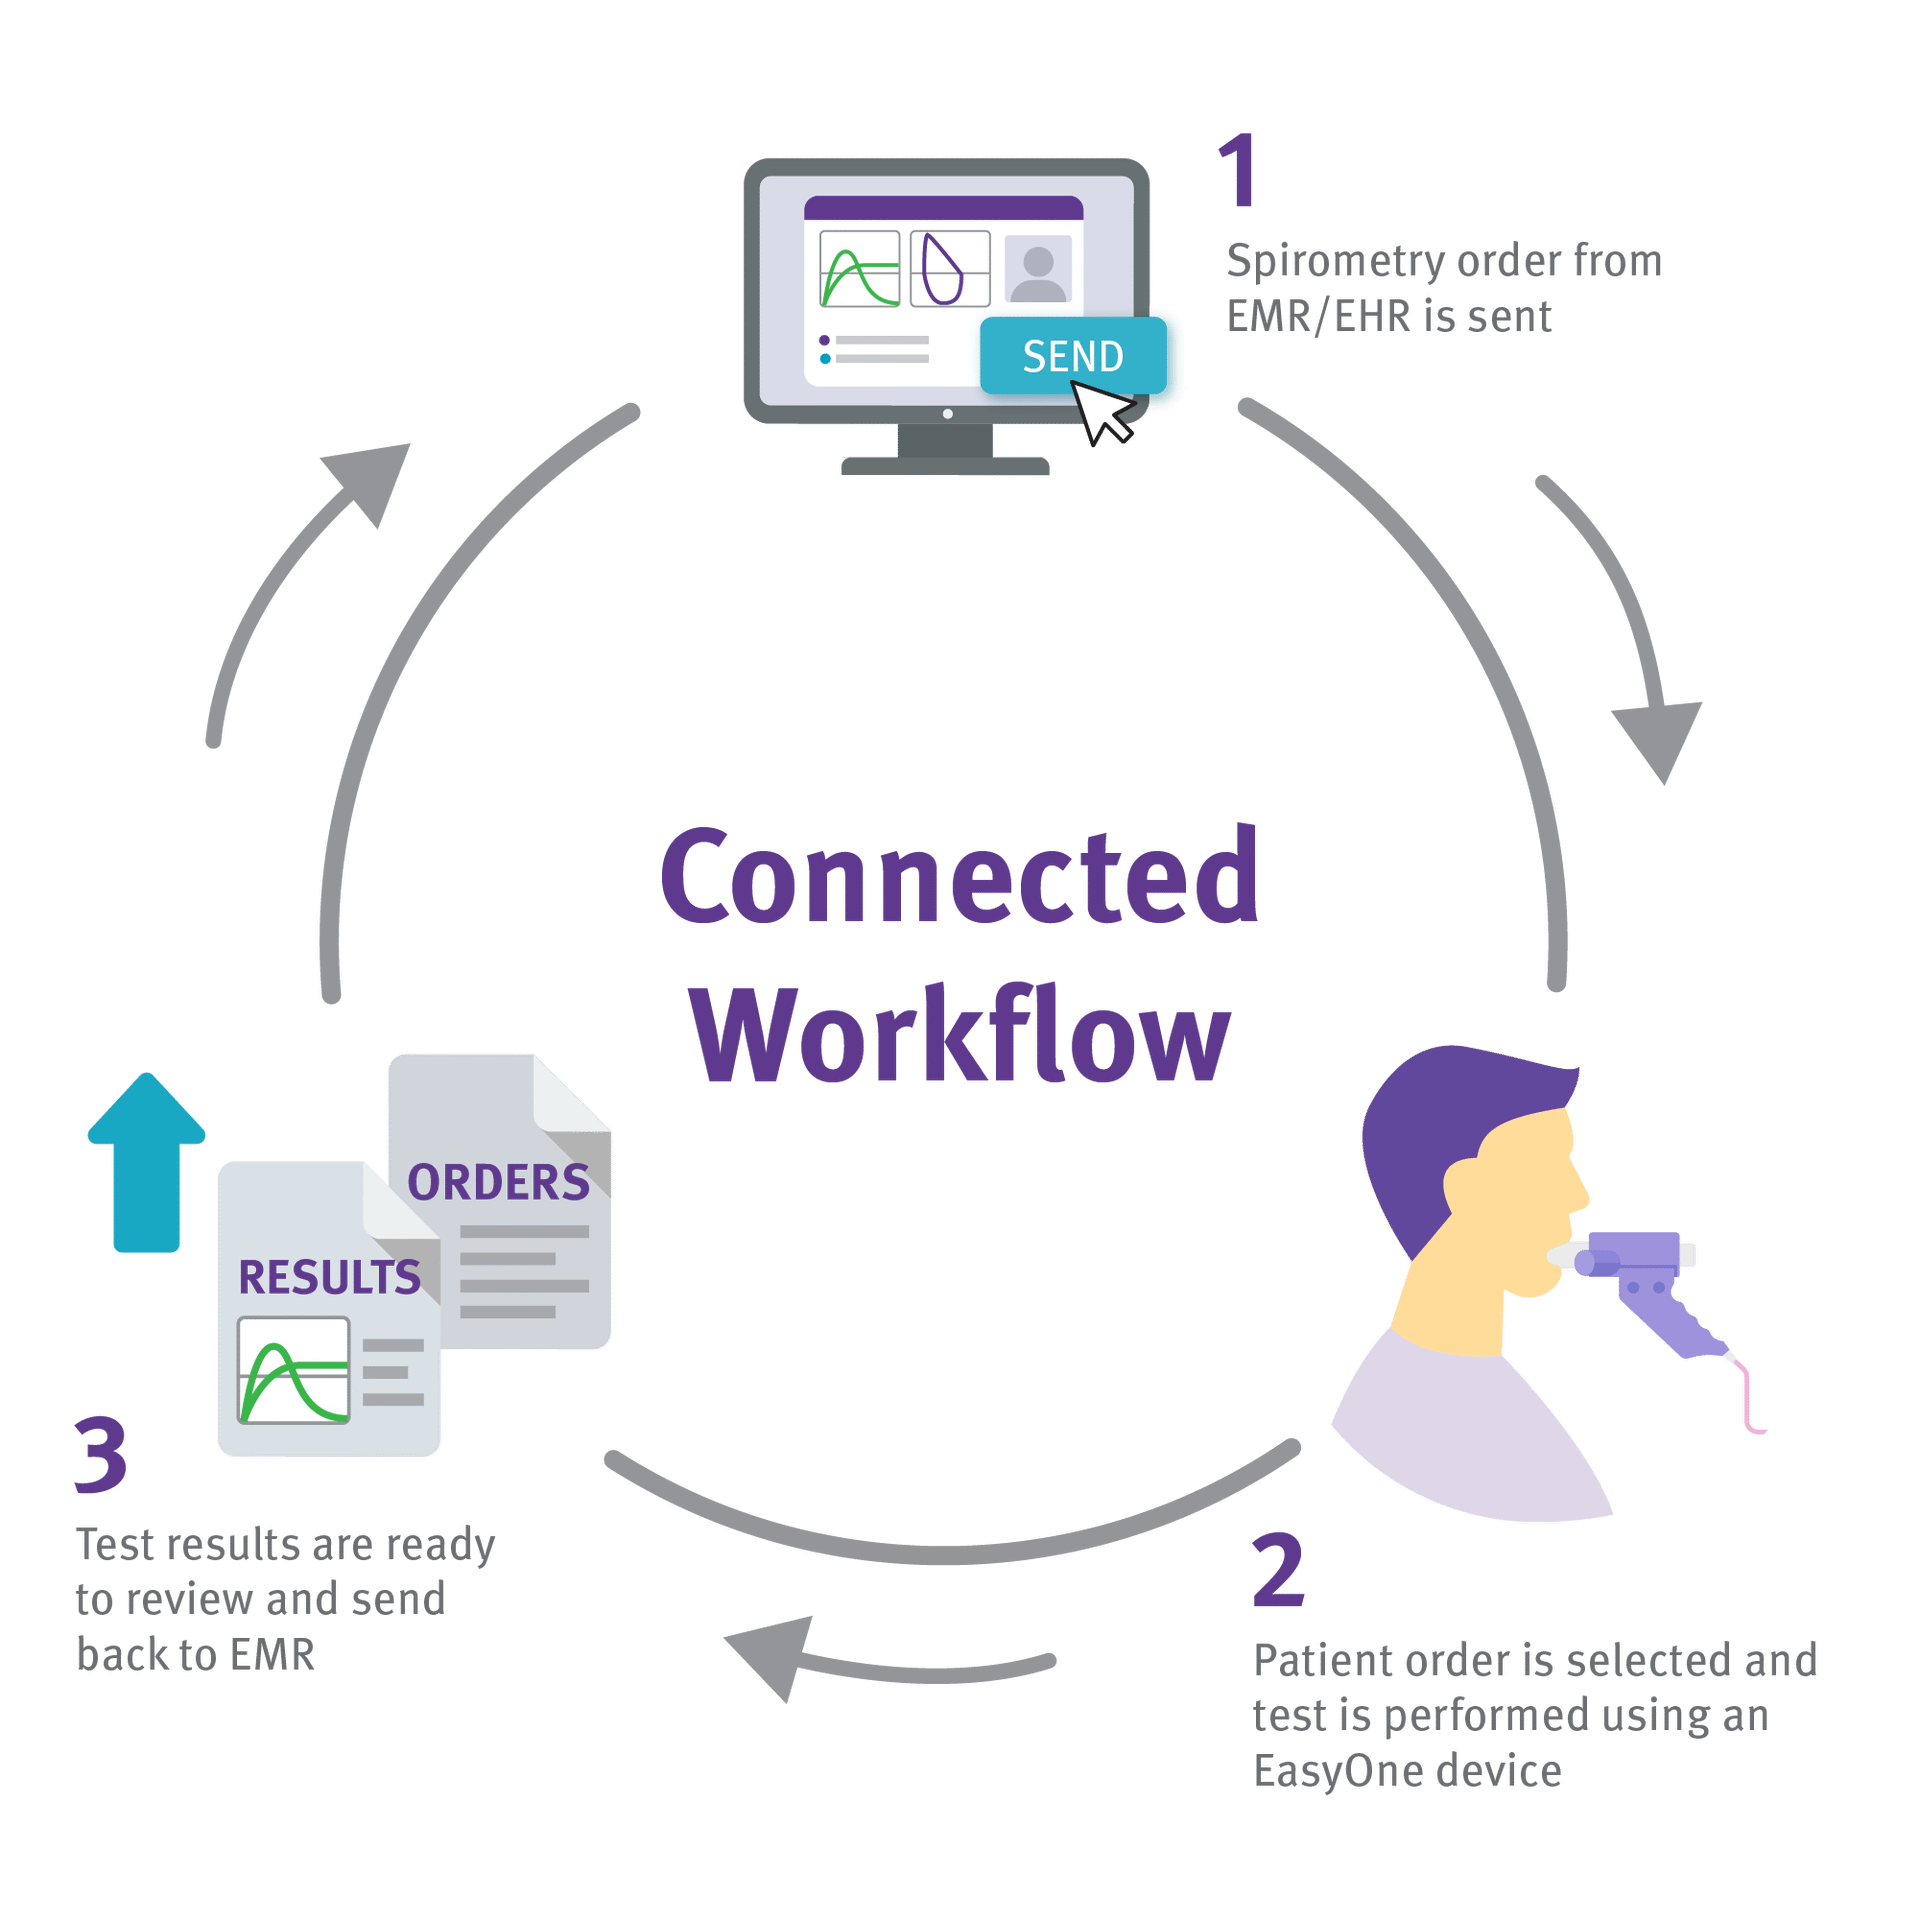
Connected Workflow
Streamline your workflow using our EasyOne Connect software. Minimize errors associated with data entry while saving time to deliver the best care to your patient.
- Automatically send discrete data and pdf reports directly into a patient’s chart
- Common coding sets supported including CPT and LOINC codes
- Open and interoperable data platform based on standards HL7 and GDT and modern technologies
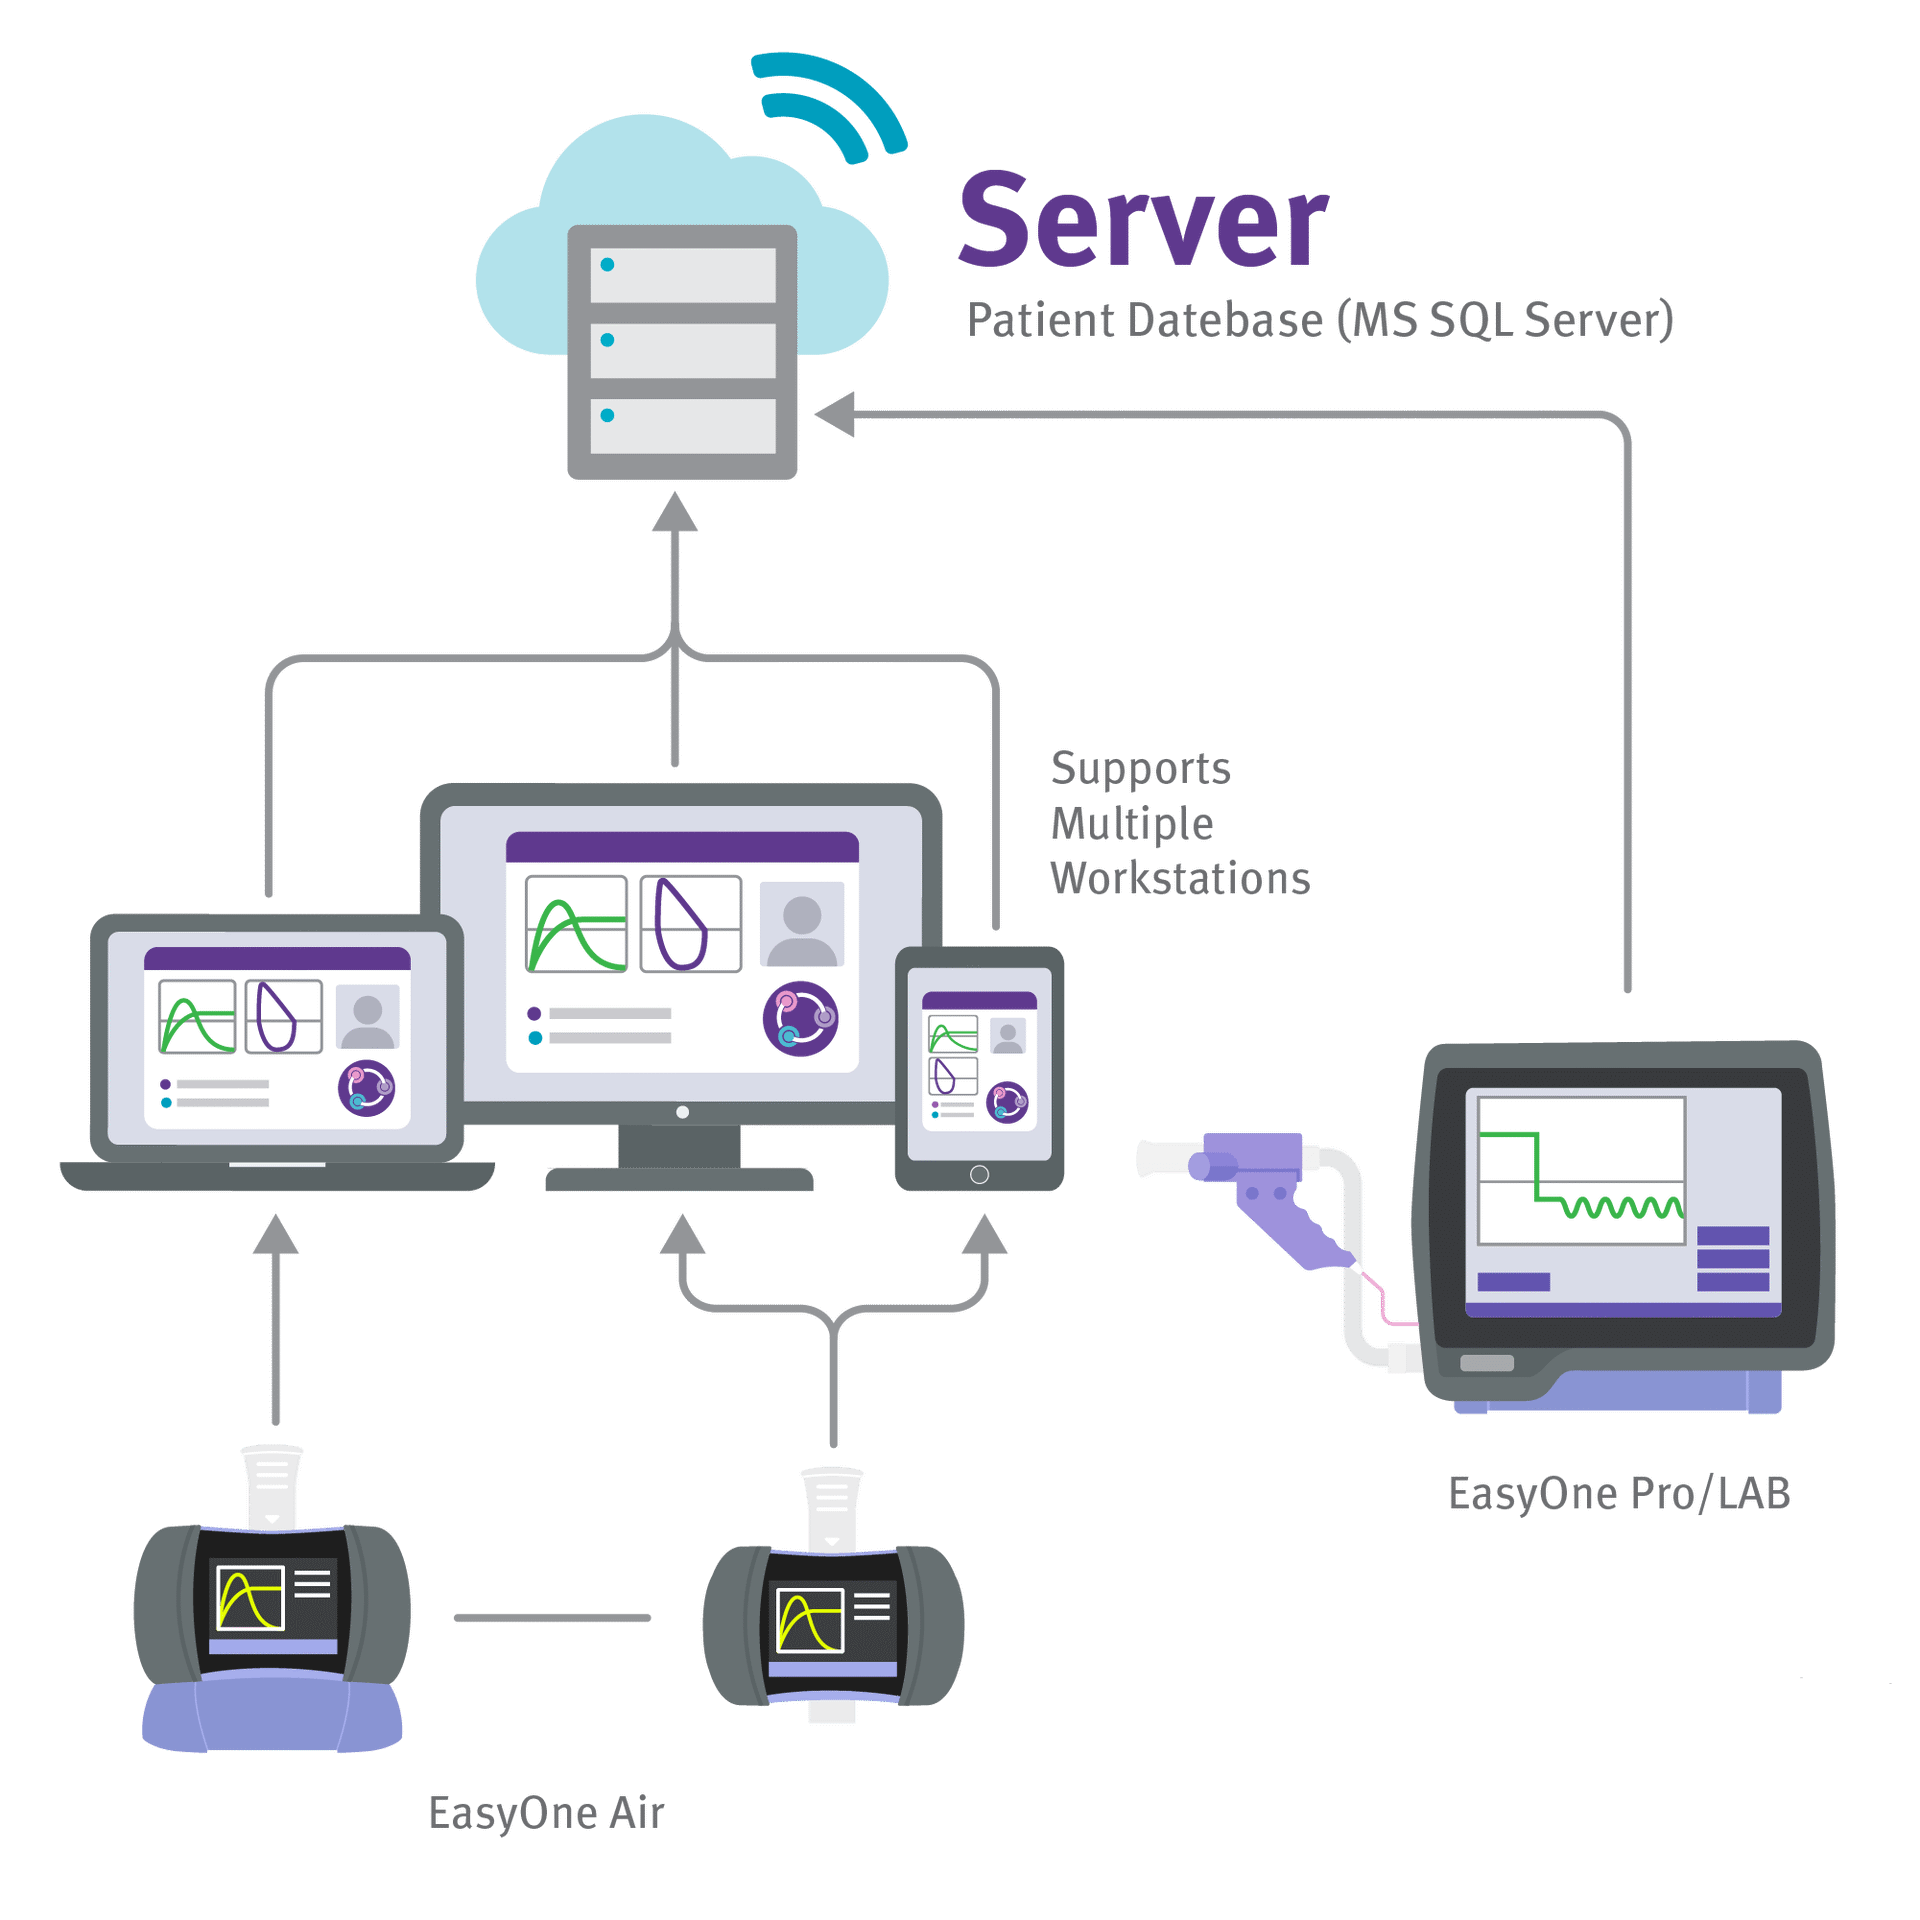
Data Centralization with EasyOne Connect
EasyOne Connect software integrates all of your ndd devices and offers central data and user management. The software works with a variety of database options to facilitate common tasks such as data storage, data centralization, and accessing data remotely. Features include:
- Microsoft SQL Server for central database storage
- Encrypted SQLite File for local database storage
- Compatible with Azure cloud server database solutions
- Supports Active Directory integration for centralized user management
To learn more about ndd IT solutions, click here.
Occupational Health
ndd products comply with the NIOSH/OSHA occupational health standards. We have established relationships with the following vendors:
- Net Health/Agility (formerly STIX/Integritas)
- Occuscan
- OHM
- OMI
- Workplace Integra
- Enterprise Health
Note: To verify the current connection status with a specific ndd product, please contact ndd or the application vendor.

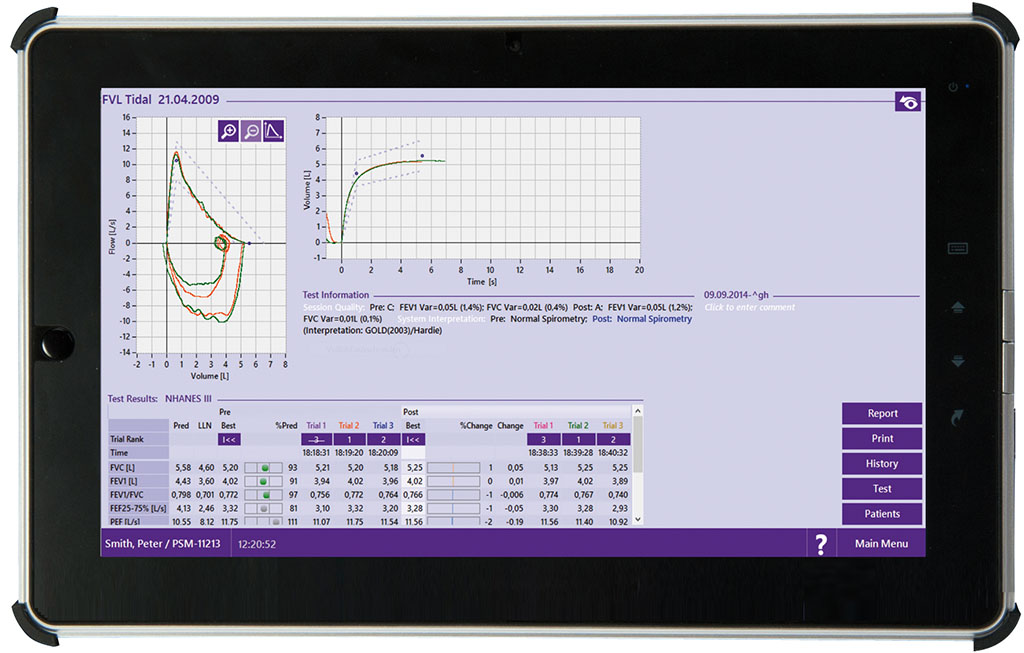
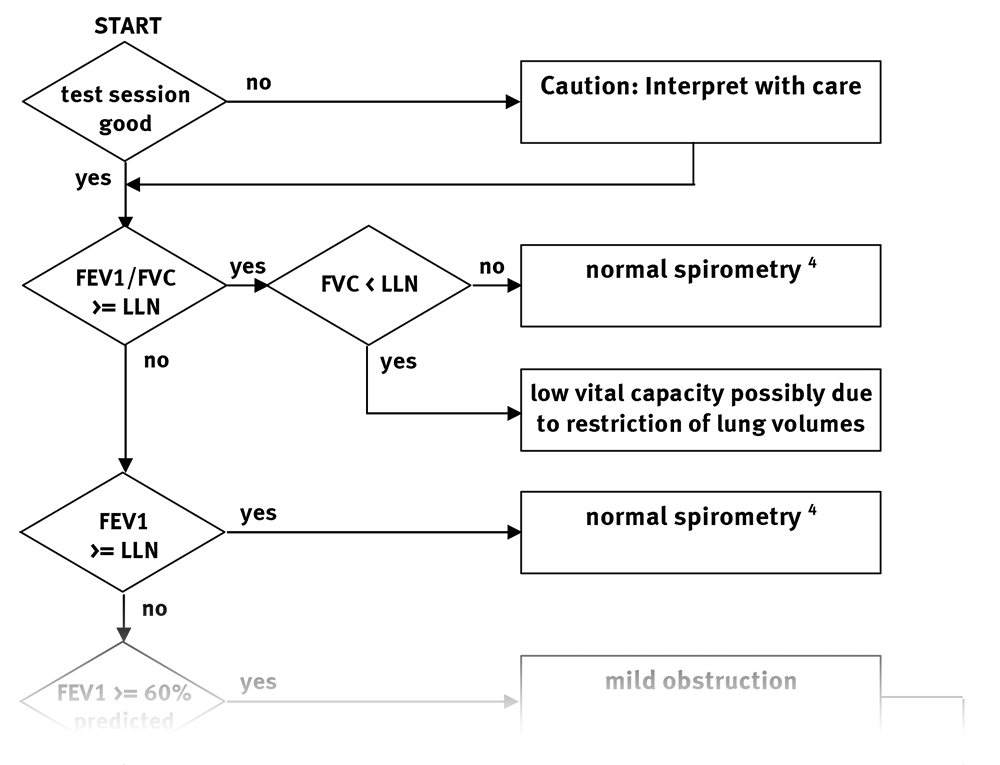
QC-Grading and Result Interpretation
Get automatic quality grading and result interpretation based on NLHEP and ATS/ERS for all tests using EasyOne Connect.
- Quality grades based on ATS/ERS 2005 and 2019 for all tests
- System Interpretation GOLD/Hardie, NICE, JRS and NLHEP
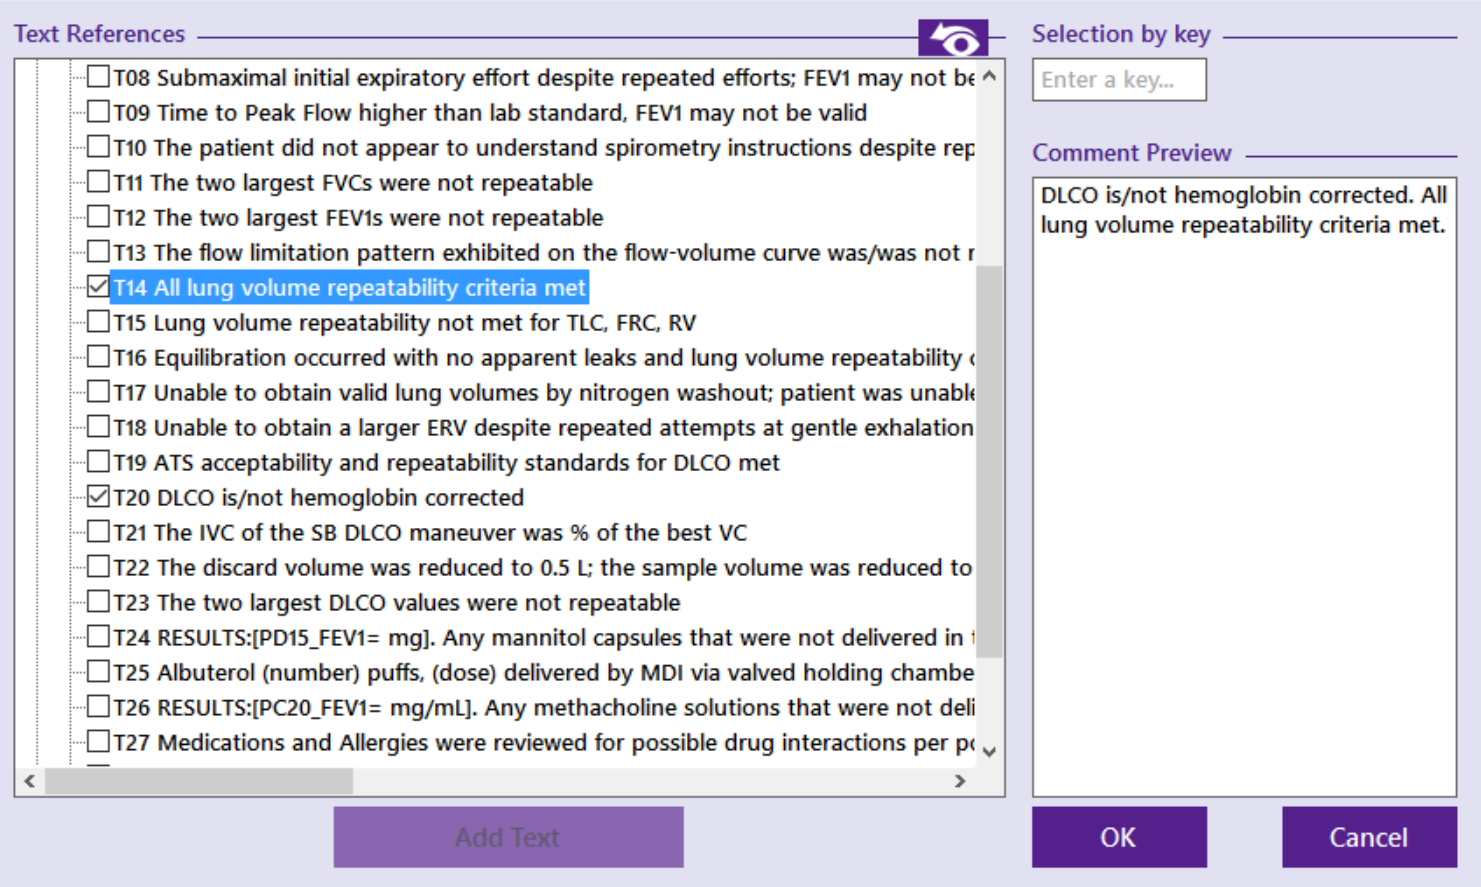
Powerful Commenter
With our integrated commenter you can easily define standard comments and quickly add them to your patient’s results.
- Predefine comments
- Quickly select or deselect
- Quickly modify comments
Watch our video guide for more details.
Encouraging Pediatric Incentives
With our simple but smart pediatric incentives children quickly understand what to do. This shortens your testing time and helps you achieve good quality spirometry results – and the children have fun doing the test.
- Birthday Cake incentive for FVC
- Elephant incentive for FVC & FVL

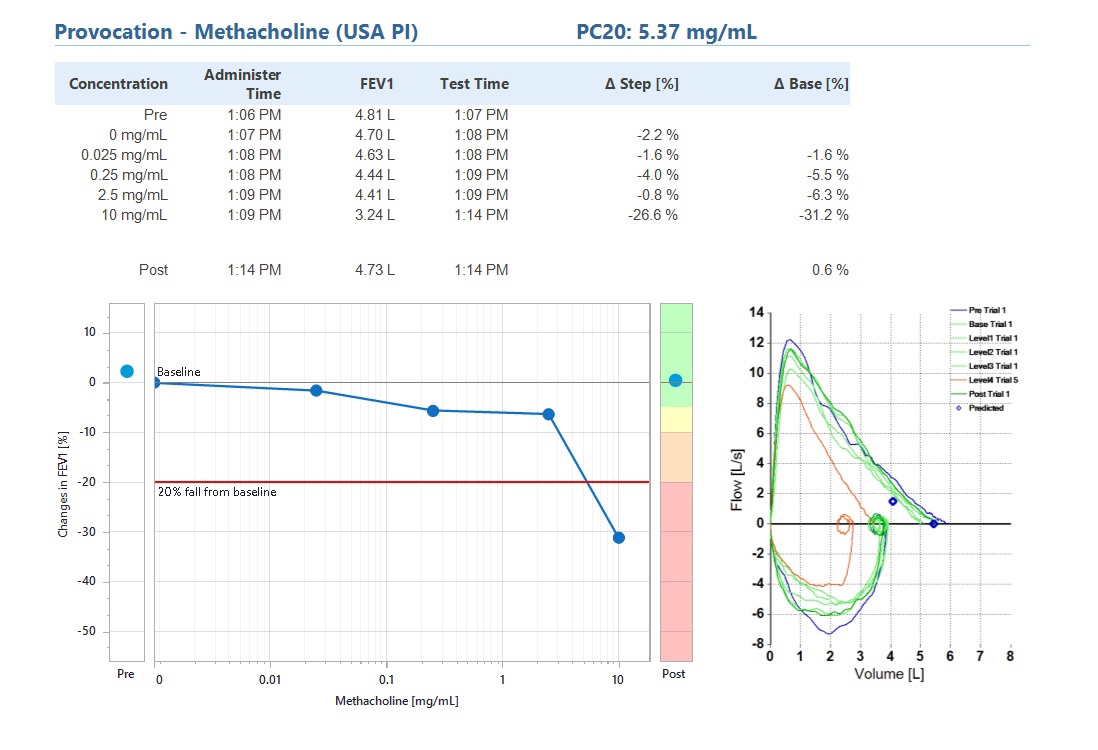
Custom Provocation Protocols
Customize available standard provocation protocols for your needs or create your own. You can easily install the customized provocation protocol on your ndd devices.
- Build your own provocation protocols
- Modify existing provocation protocols
- Export and load protocols onto other devices
Pre-installed protocols: Mannitol, MC, Exercise Provocation
Watch our video guide for more details.
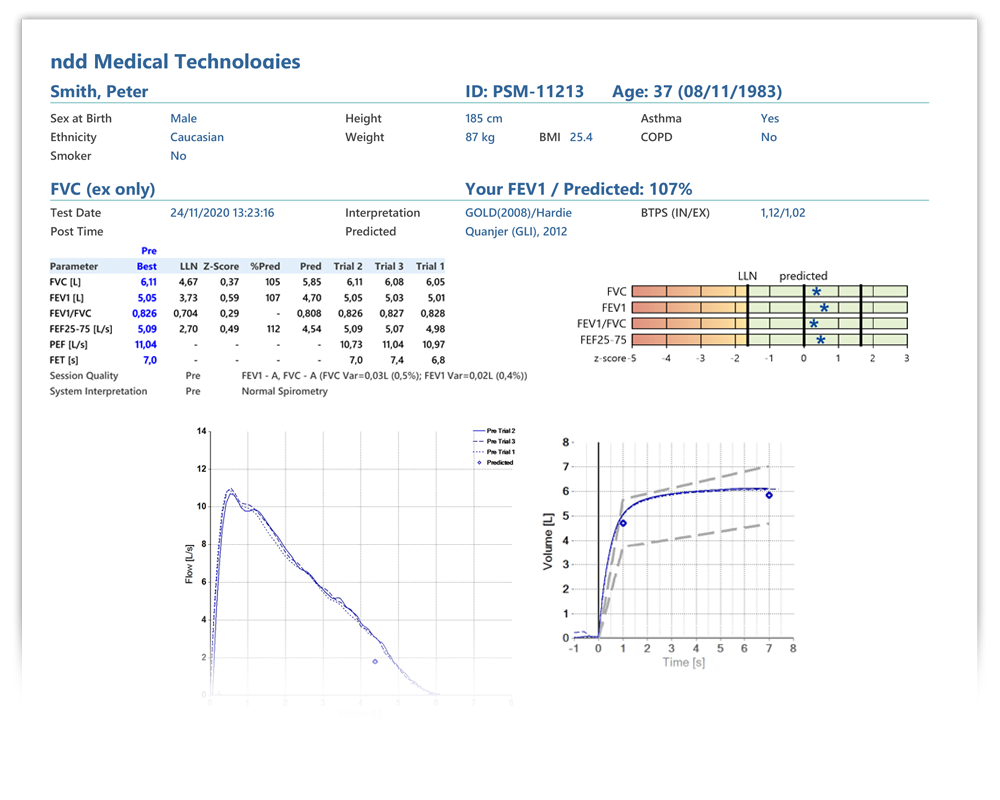
Customized Reports
Customize reports and chose the parameters to be displayed.
- Arrange graphs, parameters and tests as needed
- Choose which graphs to display
- Freely customize the tables including Z-score, % Predicted and LLN
- Color reports for better visual clarity
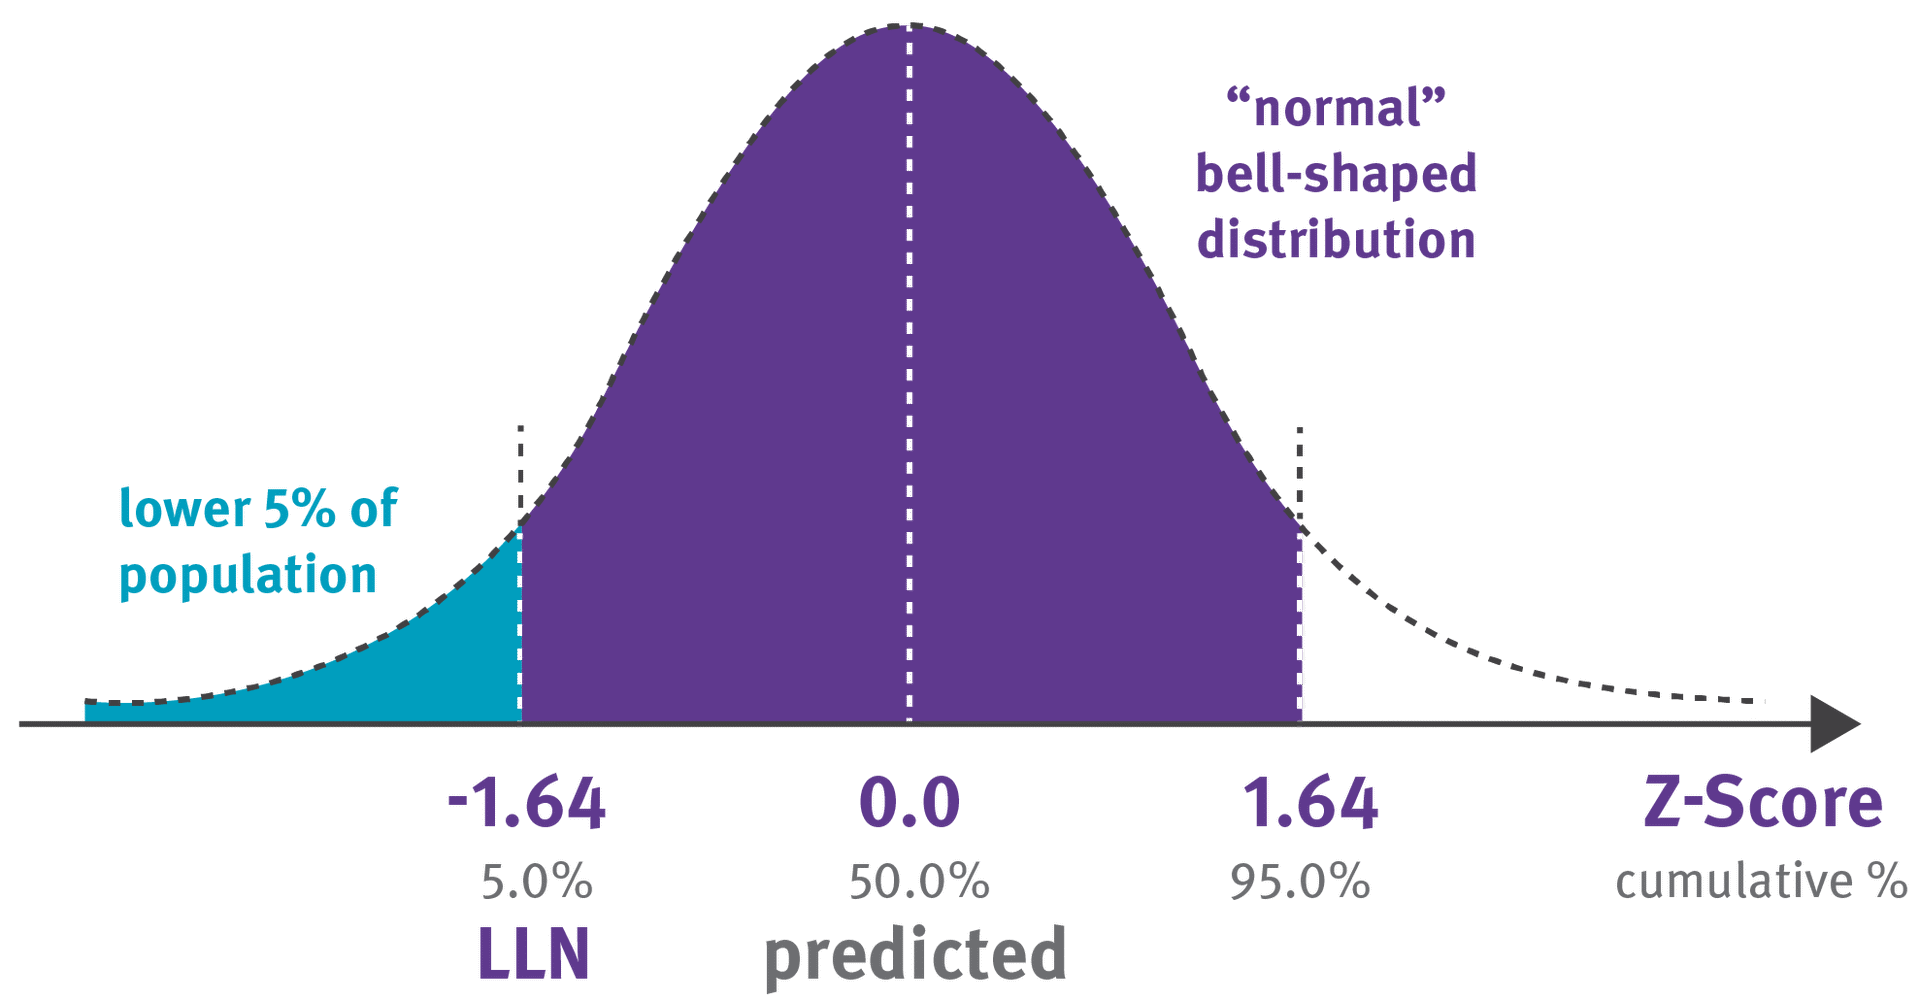
Large Selection of Predicted Sets (%Pred, Z-score and LLN)
The first in line for newly published predicted values: EasyOne devices are used in predicted studies worldwide (e.g. LUNOKID, ALAT).
- %Pred, Z-score, LLN
- GLI (Stanojevic 2009, Quanjer 2012)
- NHANES III (North America)
- PLATINO (South America)
- ERS (Europe) and JRS, IP, Chhabra (Asia)
Please see our specifications below for a complete list of the supported predicted values.
Downloads
 Software
- EasyOne Connect V03.09.07.05Release date: 2025-07-17Related documents
- EasyOne Pro V5 Updater V03.09.07.05.zipRelease date: 2025-09-01Related documents
Software is specific to your device version. Please verify before updating. Serial number range (Pro 55xxxx, Pro SN 56xxxx, LAB 65xxxx, LAB SN 66xxxx)
USB storage key needs to be min 5 GB and in exFAT or NTFS format.
 Application Notes
 Brochures
 Certificates
FAQs
Which EHR vendors can ndd integrate with?
ndd can integrate with any EHR vendor that can support a bi-directional HL7 orders/results lab interface.
What kind of integration options does ndd offer?
ndd offers a file-based integration utilizing an SFTP or network-based location for file communication with an EHR vendor. HL7 is the standard data structure that ndd utilizes but can support other data formats as well. The use of other interface engines can be utilized to complete an integration project.
What is the process for integrating your software with our existing systems?
The first step for an integration project is to complete the EMR integration request form here: https://nddmed.com/f/emr. An integration specialist will then reach out to you with the next steps.
How long does the integration process typically take?
Duration depends on the IT team of the facility. The ndd side of the integration process can be completed within a few hours for standard integrations. EasyOne Connect software is simply configured to point to the SFTP or network-based location where files are being placed.
How does ndd ensure that data is securely transferred during integration?
EasyOne Connect software utilizes AES 256 encryption. SFTP has its own security protocols built into it. If a network-based location is utilized, it will follow the protocols of the facility.
Can patient data and test results be accessed across multiple laptops and desktops within a clinic?
Yes, EasyOne Connect offers an optional centralized patient database feature, enabling seamless access to patient orders and results across all instances of the software, irrespective of physical location. Customers can leverage their on-premise SQL servers or MS Azure environments to ensure data accessibility and consistency.
Does ndd offer user management within the software?
EasyOne Connect provides flexible options for managing users and their access. User accounts can be created and managed directly within EasyOne Connect for simple permission control. For more advanced management, the software supports integration with Active Directory for using your existing directory service accounts, groups, and permissions. EasyOne Connect also supports optional single sign-on (SSO) capability. If you would like to review the Active Directory Application Note, please contact [email protected].
Can ndd provide examples of successful integration with other clients?
ndd has integrated with all major vendors and can provide examples of successful integrations with various healthcare providers and organizations. You can contact our integration department via email at [email protected] for more information.
How does ndd handle updates and maintenance to the integration?
ndd does not handle the maintenance and upgrades as the software is installed locally on the client’s machine. We do, however, offer a silent installer package that our support team can assist you with. This silent installer can be executed via a script through active directory commands depending on your facility. It is the responsibility of the facility to implement any future updates. There is no licensing fee associated with the software and/or the updates.
Are there any additional costs associated with integration?
ndd does not charge for standard integration. In the event custom development is needed, ndd will provide a statement of work before a project begins. Almost all EHR vendors will charge a fee that the client is responsible for.
What are the HL7 specifications?
HL7 specifications can be found here.
What are the database options?
- Local SQLite file-based database.
- On-premise Microsoft SQL Server database.
- Azure cloud-hosted Microsoft SQL Server database.
Please see the application note for additional information.
Who is responsible for setting up and hosting the SFTP and/or network-based location?
The facility is responsible for setting up and hosting either option. ndd requires a username and password if using an SFTP environment.
What results are received in the HL7 message?
The result HL7 message will consist of a combination of discrete results and an embedded base64 PDF attachment for the PFT report. If you prefer, we also offer the option of including a reference link instead of the embedded PDF.
Is a server required?
No, a server is not required.
What kind of support does ndd offer during and after the integration process?
You can schedule a meeting with an integration engineer from 8 a.m. to 5 p.m. ET Monday through Friday. ndd can accommodate meetings outside of that timeframe if planned accordingly. The integration team can be reached via email at [email protected]. The support team can also be reached via email at [email protected] or by phone at (978) 470-0923.
Is one ndd device better than the others for integrating with an EMR?
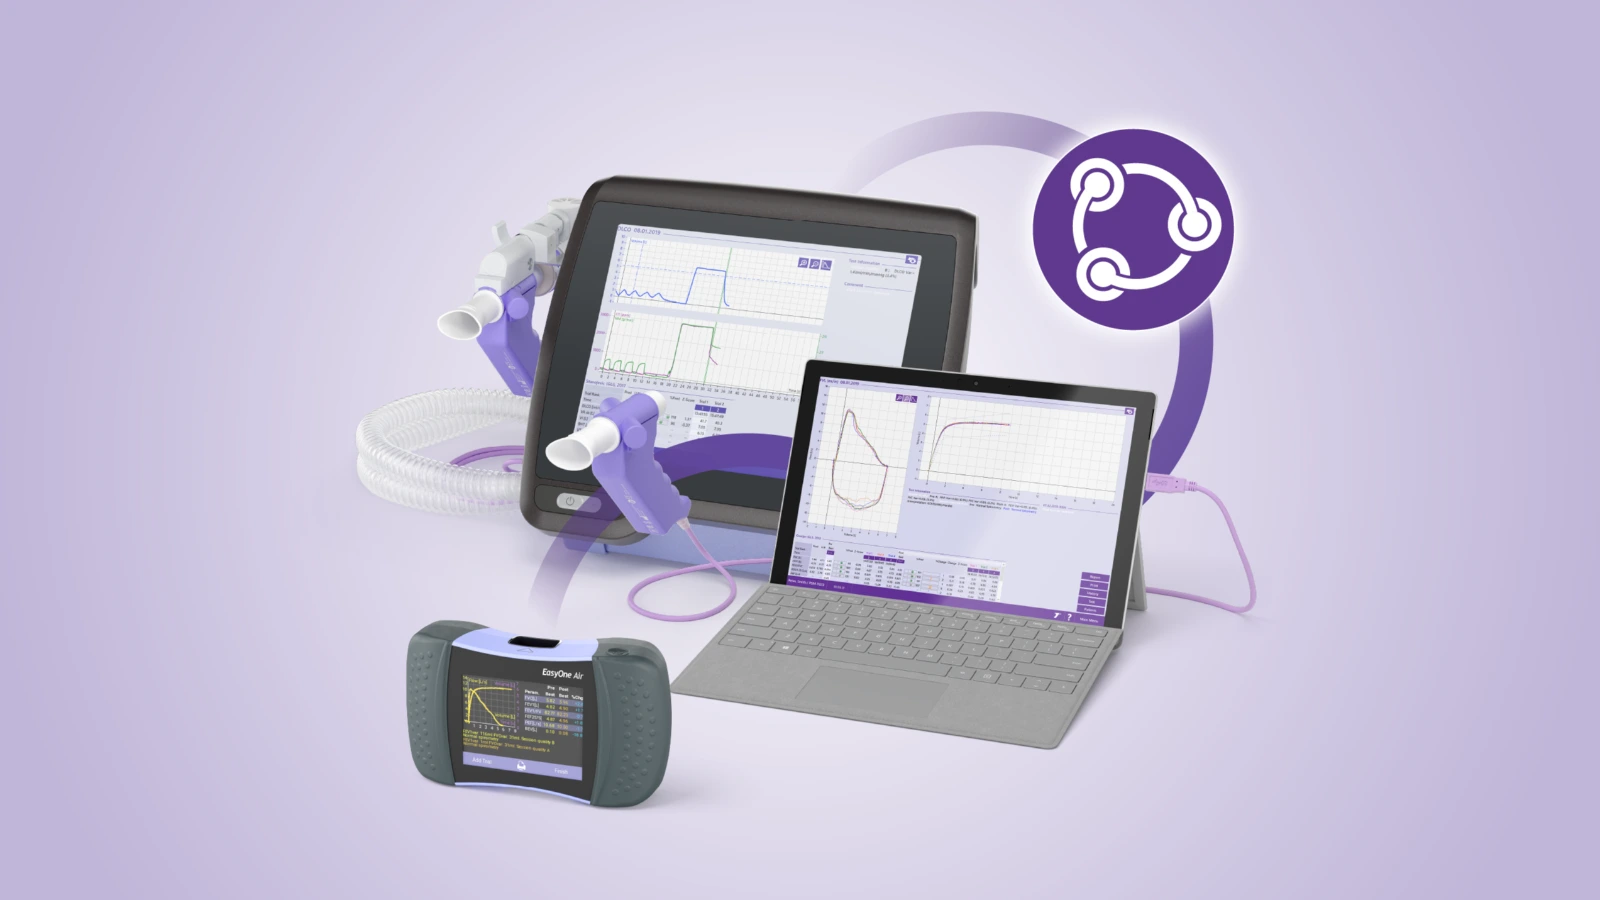
All current generation ndd devices, EasyOne Air, Easy on-PC and EasyOne Pro/LAB V5, are equally capable of integrating with your EMR.
How to backup my database in EasyOne Connect
In EasyOne Connect, go to: Utilities > Export Data > tick Patient Data > click Export. Save the file in the preferred location.
Learn more by watching the video below.
How to change or update the ATS Spirometry Standard setting in EasyOne Connect
The ATS Spirometry Standard setting can be viewed or changed in Utilities > Configuration > Test tab > FVC/FVL tab.
The setting is under ‘Applied Spirometry Standard’. Click Save after making changes.
Changing the setting will only affect future tests.
Learn more by watching the video below.
How to change or update the header information for my reports in EasyOne Connect
The EasyOne Connect header information can be changed in Utilities > Configuration > General tab > Header tab.
Input your facility’s information and click Save.
This information will appear on the top left of the main menu. It will also appear on the top of the report print out.
Learn more by watching the video below.
How to change or update the Predicted Reference and Interpretation setting in EasyOne Connect
The selected predicted reference and interpretation can be changed in Utilities > Configuration >Test tab > Predicted tab.
Refer to the Predicted Reference application note for more information on each of the options.
The interpretation can be changed in the same location under ‘System Interpretation’.
- Previous tests can be updated with the ‘Update Test’ button.
- Enter your user ID and press Login. Click OK to confirm the changes and then Yes to start the update. The update time varies and may take several minutes depending on database size.
- Click OK once complete and then click Save
Learn more by watching the video below.
For more information see the AppNotes Recalculation Predicted Values and Predicted Normal Values Overview.
How to change the displayed parameters in EasyOne Connect
The parameters can be changed in Utilities > Configuration > Test tab and then select the tab for the specified test.
The video will show how to adjust the FVL parameters.
- Click the ‘Select’ button under the Parameters section.
- The Display side shows the parameters on the test screen.
- The Print side shows the parameters on the Report screen.
- Use the scroll bar to find certain parameters and use the left and right arrows to move the parameters between the available and selected columns.
- Use up and down arrows to change the order of the parameters.
- Click Save and repeat this process for other test types.
Learn more by watching the video below.
How to change the report settings in EasyOne Connect
Report settings are found in the Configuration section of EasyOne Connect in the ‘Test’ tab and the ‘Report’ tab.
Review the settings on these pages to modify your reports.
The report layout can be changed on the Report screen in the Layout selection drop down menu.
Learn more by watching the video below.
How to check which version of EasyOne Connect software is installed on my PC
The EasyOne Connect software version can be found in Utilities > Configuration > General Tab > Header tab.
Click ‘About’ and a software details box will appear that lists the software version.
The latest software can be downloaded from our website.
Learn more by watching the video below.
How to configure EasyOne Connect for an existing GDT integration
This example is of a GDT setup.
A GDT folder can be set up in Utilities > Configuration > EMR tab.
- Select GDT from the drop down menu
- Select the Transfer folder for GDT.
- Review the remaining settings.
- Select if a report should be attached.
- Click Save.
Learn more by watching the video below.
For more information see the AppNote.
How to configure EasyOne Connect for an existing HL7 integration
This example is of an HL7 setup.
An HL7 folder can be set up in Utilities > Configuration > EMR
- Select HL7 from the drop down menu.
- Select the In and Out Transfer folders for HL7.
- Review the remaining settings.
If a report is selected to be attached, select the folder name, structure, and file type.
- Click Save.
For more information see the AppNote.
How to configure EasyOne Connect for an existing XML integration
This example is of an XML setup.
An XML folder can be set up in Utilities > Configuration >EMR tab
- Select XML from the drop down menu
- Select the In and Out transfer folders for XML.
- Review the remaining settings.
- If a report is selected to be attached, select the folder name, structure and file type.
- There are optional settings to include the trial data and curve data.
- Click Save once complete.
Learn more by watching the video below.
For more information see the AppNote.
How to create a new patient database in EasyOne Connect
A new database can be created in Utilities > Configuration > General tab > Storage tab, click New, Select File Based, click New Name the file, click Save.
Setting a password is optional. This password is needed to open the database and cannot be recovered. Make sure to remember the password, otherwise the data cannot be accessed.
Click OK, Click save.
The software will refresh and the new database will be loaded.
Learn more by watching the video below.
How to export a single patient database
ndd Service and Support may request a single patient database for review if there are any questions about test performance.
A single patient database can be exported from EasyOne Connect in the following:
Patients > Select the patient > Click the double arrows to expand the menu > Select Database > Click Save File as and save the file > Click Export.
How to export the EasyOne Connect configuration file from one PC and import into another
The configuration file can be exported from one PC and loaded into the software on another PC. This is an easy way to transfer settings.
The configuration file can be exported from Utilities > Export Data > tick Option Settings > click Export > save the file.
The configuration file can be loaded in Utilities > Configuration > Storage tab > Load Configuration > Find the file and click open.
The software will reload.
Learn more by watching the video below.
How to export the logfile from EasyOne Connect
The log file can be exported from EasyOne Connect in Utilities > Export Data > select Logging Information > click Export.
Some errors prevent the software from opening, so another way to retrieve the log file is by navigating to the path C:\ProgramData\ndd\EasyOne Connect\Log.
There you should find the Files EWPro.log and EWPro_bak.log
Learn more by watching the video below.
How to export the report as pdf in EasyOne Connect
Patient reports can be exported as a PDF file.
- Click Patients and select a patient.
- Open the patient history.
- Select a test > Click Report > select Print menu.
- In the top right corner, click Export to and select PDF.
- The File Explorer will open.
- Save the file in the desired location.
- The software will then prompt to open the PDF file for review.
- Click Yes to open the PDF or click No to return to the software.
Learn more by watching the video below.
For more information see the AppNote.
How to export the XML database from EasyOne Connect and convert it to a CSV file
The EasyOne Connect Patient Data can be exported as an XML file and converted to a CSV file. First locate the EasyOne Connect Data Export application note found on our website.
- Click on the link in the app note to download the zip file, which contains a library of required files needed for the conversion.
- Extract the files from the ZIP folder.
- In Easy One Connect export the XML file of the database. Go to: Utilities > export XML.
- Save the XML file in the XML input folder in the conversion file library.
This will export the entire database. Single tests can also be exported as an XML file in the patient history.
The Conversion File library contains several conversion options that include different parameters.
- Double click on a bat file to run the conversion. This will convert any files in the XML input folder.
Press any key to close out of the conversion window.
The converted CSV file is found in the CSV output folder.
Learn more by watching the video below.
How to import a patient database
A database can be imported into the currently selected database in Utilities Configuration, the General tab, the Storage tab, click Import, Select File Based.
Click select. Select the database file to be opened.
Click Open. Click OK.
When the import is complete, click Save.
The chosen database will be merged with the currently selected database.
Learn more by watching the video below.
How to locate the currently selected database in EasyOne Connect
In EasyOne Connect, go to: Utilities > Configuration > General (tab) > Storage (tab) and there it is listed under database name. Default location on the PC:
C:\ProgramData\ndd\EasyOne Connect\EasyOneConnect.sqlite.
Learn more by watching the video below.
How to rename the options database in EasyOne Connect (reset EOC configuration)
The EasyOne Connect software has an Options database, which is a file that contains all the settings and utilities. Replacing this file may resolve errors with EasyOne Connect.
Please note, following these steps, we’ll revert the software to default settings and remove EMR setups.
- Navigate to C:\ProgramData\ndd\EasyOne Connect\
- Hint: The ‘program data’ folder is a hidden folder
- Rename the EasyOne Connect options.mdb file.
Once the file is renamed, reload the software to force the file to automatically regenerate.
Check if the issue is resolved.
Learn more by watching the video below.
How to select a different patient database in EasyOne Connect
A different database can be selected in Utilities > Configuration > General tab > Storage tab.
Click Select > Select File Based.
Click Select. Select the database file to be opened. Click Open Review the database path. Click OK Click Save.
The software will refresh.
Learn more by watching the video below.
How to setup or enable the User Handling to require EasyOne Connect software logins and to define user permission levels
User handling can be enabled to require software logins and to define user permission levels. Users can be set up in Utilities > Configuration > General tab > User Handling tab.
- Enter the admin password to access the settings.
- Click on the Local Users tab to create users and edit permissions.
- Select ‘Add’ and enter the information to create a user.
- At least one user needs to be set up in the admin user group. User groups have different permission levels.
- Click ‘Permissions’ to add user groups and to view or change the permissions for each user group.
- Click on the ‘General Settings’ tab to enable user management and
- Click Save.
This will prompt the software to restart and require a user to log in. The bottom left shows the user logged in and provides a log off option.
There is also an option to integrate with your Active Directory. Contact your IT department an refer to the application note on our website For more information.
Learn more by watching the video below.
For more information see the AppNote.
How to troubleshoot Bluetooth connection issues with my EasyOne Air device
Any Bluetooth connection issues with the EasyOne Air device will prevent the device from connecting consistently with the EasyOne Connect software. This often occurs when the EasyOne Air device is paired to multiple nearby computers. Here a few steps to try and resolve:
- Restart the PC and EasyOne Air
- Check the PC for Windows updates
- Ensure the EasyOne Air is within 10 meters of the PC
Another troubleshooting step is to delete all the Bluetooth connections from the EasyOne Air device. To do this go to:
- Tools > Settings > Bluetooth
- Scroll to the bottom of the page to BT Connections
- Press and hold ‘long click to delete all..’
- Enter the admin password
- Click yes to confirm deleting the connections.
- Return to the main menu.
Another step is to remove the device from the list of paired Bluetooth devices on the PC and re-add it.
Follow along with the video to remove and re-add the device.
For more information see the AppNote.
Specifications
System Requirements
Hard disc capacityInstallation/ system 1 GBDatabase sizeFile database up to 4GB
Server database up to 8GBRAM2 GBOperating systemWindows 7 SP1, Windows 8 and 8.1(32 and 64 bit), Windows 10 (32 and 64 Bit), Windows 11MS SQL Server (optional)Microsoft SQL Server 2008, 2014 or higher